
BASEMENT WATERPROOFING · LIMA, OH
Crawl Space Encapsulation in Lima, OH
A crawl space with exposed dirt is feeding moisture into the rest of your house continuously, because air moves upward through the floor whether you can feel it or not. Encapsulation means a heavy reinforced liner across the floor and up the walls, mechanically fastened at a termination strip with every seam sealed, plus a dehumidifier sized to the space. In Lima clay, where the ground holds water most of the year, an open crawl space is one of the most common causes of a musty house with no visible leak. Call (419) 731-9193 for a free on-site inspection.
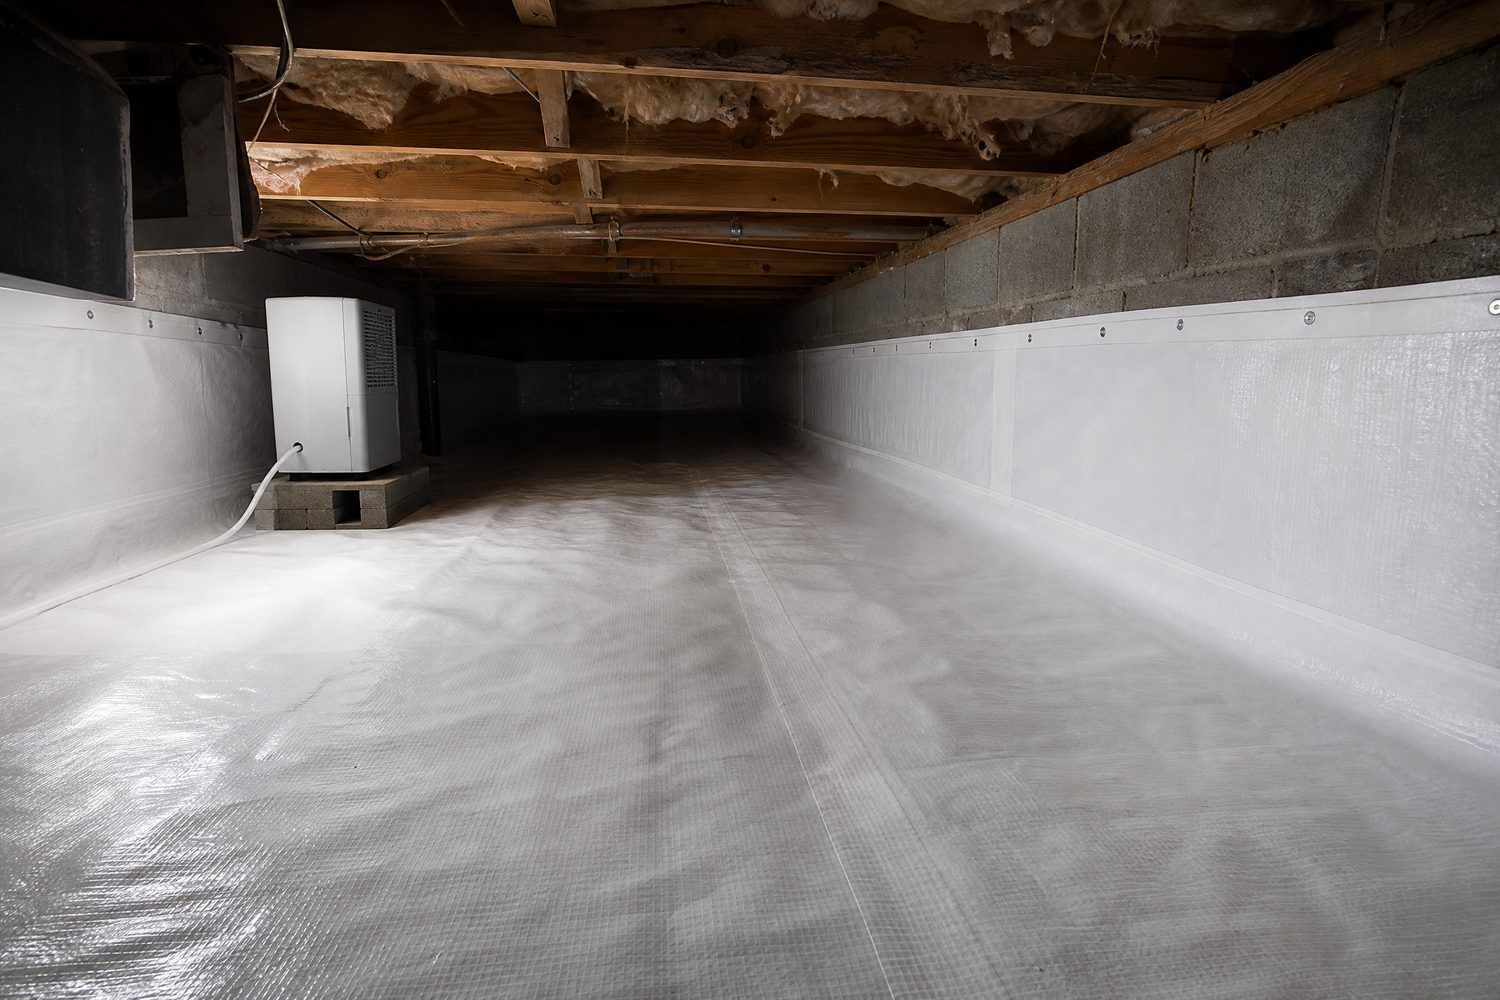
What crawl space encapsulation involves
We clear the crawl space first — old insulation that has fallen, debris, and any standing water or organic material on the ground. If there is water actively pooling, that gets addressed with drainage and a sump before anything else, because a liner over a wet floor traps water rather than controlling it. Then a reinforced polyethylene liner goes down across the entire floor, run up the foundation walls and mechanically fastened to a termination strip near the top rather than taped and hoped for. Every seam is overlapped and sealed, and the liner is cut and sealed around piers rather than simply laid past them.
The liner alone does not finish the job. Once the ground is sealed off, the remaining moisture in the enclosed air has to be controlled, so a dehumidifier sized to the actual cubic footage goes in with a condensate line routed to drainage. We also seal the vents. That runs against what a lot of homeowners were told years ago about crawl spaces needing ventilation, and it is worth explaining why: in an Ohio summer, venting a cool crawl space with warm humid outside air causes condensation on every cold surface down there, which is the opposite of drying it out. A sealed and conditioned crawl space stays dry. A vented one in this climate does not.
When you need crawl space encapsulation: signs and situations
Crawl space problems usually announce themselves upstairs rather than down below, which is why they get misdiagnosed.
- A musty smell in the house that gets worse in humid weather and is strongest near floor vents
- Floors that feel cold or damp underfoot, or hardwood that has cupped or buckled
- Visible condensation on ductwork, pipes or floor joists inside the crawl space
- Fibreglass insulation that has sagged, fallen or turned dark with moisture
- Exposed dirt floor, or a loose sheet of plastic laid on the ground that has torn and shifted
- Mould on joists or subfloor, or fungal growth on wood surfaces down there
Get Your Free Quote
Why crawl spaces stay damp in Lima
The ground under a Lima crawl space is almost never dry. Clay loam over glacial till holds water rather than shedding it, and the Allen County soil survey documents a seasonal high water table within roughly six and a half feet of the surface — which for a crawl space, sitting only two or three feet down, means damp soil directly under the house for much of the year. Water evaporates continuously from that exposed dirt into the enclosed air. A crawl space with a bare floor can put a surprising volume of water into a house over a season, and none of it shows up as a leak because there is never any standing water to see.
That moisture does not stay in the crawl space. Air moves upward through a house naturally — warm air rises and escapes at the top, drawing replacement air in from the lowest point, which is the crawl space. So a meaningful share of the air you breathe upstairs arrived through the dirt underneath. It carries humidity, odour and whatever is growing down there. Lima summers make it worse, because the traditional advice to keep crawl space vents open means pulling warm humid outside air into a cool space where it immediately condenses on ductwork and joists. That is why homes here often have a crawl space that gets wetter in July than in April.
What affects the cost of crawl space encapsulation in Lima
Priced primarily by square footage, then adjusted for access and what has to come out first. Full ranges are on our cost page.
- Square footage of the crawl space floor and wall area to be lined
- Headroom and access — an eighteen inch crawl costs more per square foot than a four foot one
- Cleanout required: fallen insulation, debris, standing water or organic material
- Whether drainage and a sump are needed before the liner goes down
- Dehumidifier capacity and where the condensate line can be routed
- Number of piers and penetrations the liner has to be cut and sealed around
Encapsulation or a vapour barrier — what the difference actually is
A vapour barrier is a sheet of plastic laid loose on the crawl space floor. It is better than nothing and it is inexpensive, and if your crawl space is genuinely dry with only mild seasonal humidity it may be all you need. What it is not is encapsulation. Loose plastic does not cover the walls, is not sealed at the seams, gets displaced the first time anyone crawls through, and leaves the perimeter open, which is where a lot of the moisture enters. Some contractors quote a vapour barrier and describe it as encapsulation, and the price difference tells you which one you are actually being sold.
Encapsulation seals the space as a system: reinforced liner across the floor and up the walls, mechanically fastened at a termination strip, every seam and penetration sealed, vents closed, and a dehumidifier maintaining the enclosed air. The point is not the plastic — it is that the crawl space stops being connected to the ground and the outside air. In Lima's climate and soil that distinction decides whether the problem comes back. We will tell you honestly if a vapour barrier is sufficient for your house, because sometimes it is and you should not pay for more than you need.
Our step-by-step process
- STEP 1
On-site inspection measuring humidity, checking joists and subfloor, and assessing headroom and access
- STEP 2
Written fixed-price quote based on measured square footage and what has to be removed first
- STEP 3
Cleanout — fallen insulation, debris and organic material removed from the space
- STEP 4
Drainage and sump installed first if there is standing water, since a liner over water traps it
- STEP 5
Reinforced liner laid across the floor, run up the walls, and mechanically fastened at a termination strip
- STEP 6
All seams overlapped and sealed; liner cut and sealed around every pier and penetration
- STEP 7
Vents sealed and a correctly sized dehumidifier installed with the condensate line routed to drainage
- STEP 8
Humidity verified after the system runs, then a walkthrough with photos of the finished space
Timeline and what to expect
Most Lima crawl spaces take one to two days. Cleanout is the variable — a space full of fallen insulation and forty years of debris can take a full day on its own before any liner goes down. This is far less disruptive than basement work: no concrete cutting, no excavation, and we work through the existing access rather than through your house. You will notice a difference in the smell upstairs within a few days, though the humidity takes a couple of weeks to fully stabilise as the wood down there gives up moisture it has been holding. If drainage and a sump are part of the scope, add a day. Unlike exterior excavation, this work is not weather-dependent, so it can be scheduled any time of year.
GOOD TO KNOW
FAQs
Should crawl space vents be open or closed?
Closed, in this climate, and this is the single most common piece of outdated advice we run into. The reasoning behind venting was that airflow dries a space out, which works in a dry climate. In an Ohio summer, outside air at eighty-five degrees and high humidity entering a crawl space at sixty-five degrees condenses on every cool surface down there — ductwork, pipes, joists. You are not drying the space, you are delivering water to it. A sealed crawl space with a dehumidifier stays measurably drier year-round.
Will encapsulation get rid of the musty smell in my house?
In most cases yes, and usually faster than people expect. If the smell is coming from the crawl space — which it often is, because air moves upward through the floor — sealing the ground off and controlling the humidity removes both the moisture and the conditions that produce the odour. You will typically notice a change within a few days. If the smell persists after a couple of weeks with the dehumidifier running, then something else is contributing and we will come back and find it.
Do I need a dehumidifier, or is the liner enough?
You need both, and skipping the dehumidifier is the most common way an encapsulation job underperforms. The liner stops moisture coming out of the ground. It does not remove the moisture already in the enclosed air, or the moisture held in the wood framing, or what enters through the rim joist and access door. Without a dehumidifier a sealed crawl space can actually hold humidity longer than a vented one. The dehumidifier is what makes the sealed space stay dry rather than just stay closed.
What if there is standing water down there?
Then drainage comes before the liner, always. Encapsulating over standing water traps it under the plastic, where it continues to sit against your foundation and framing with no way to evaporate — which is worse than leaving it open. We install drain tile and a sump in the crawl space first, get it dry, and then encapsulate. Anyone willing to lay a liner over standing water without addressing the water is doing you real harm.
Can I use my crawl space for storage afterwards?
Yes, within reason, and it is one of the practical benefits people do not expect. An encapsulated crawl space with controlled humidity will not ruin what you put in it, which an open dirt crawl space certainly will. Keep items off the liner where you can, use bins rather than cardboard, and be careful not to puncture or drag anything across the liner — a tear defeats the point. Do not block the dehumidifier or the access path.
Find out what is under your floor
Free on-site inspection with humidity readings and photos of what we find down there. Written fixed price, and an honest answer about whether a vapour barrier would do.